VERSE INTEL
STAR CITIZEN COMPANION GUIDE · COMMUNITY MAINTAINED
LIVE 4.7.0
50 CONTRACTS · 16 PAGES
WIKELO CONTRACTS
All 50 collection contracts with verified ingredient lists, item quantities, community tips, and accuracy tracking. New to Wikelo? Start with the intro contract first.
→ MISSION CHAIN
ONYX FACILITIES
Phase 1 → Phase 2 → Site B walkthrough. The only source of ASD Secure Drives and RCMBNT components — both needed for most hard ship contracts. Yormandi boss guide included.
→ ONYX GUIDE
STORM BREAKER
Pyro's multi-stage open PvP event. The only source of Irradiated Valakkar Fangs and Pearls. Covers Farro Data Centers, Lazarus Complexes, the Calling Tower, and the Apex boss fight.
→ PYRO GUIDE
4.7 CRAFTING
New in Alpha 4.7. Blueprints, material quality, fabricators, dismantling, and what's actually worth crafting. Community-verified data with known bugs tracked.
→ CRAFTING GUIDE
PLAN MY GRIND
Pick any target ship from the reward calculator. Get every ingredient, time estimates per item, and a recommended farming order so you're not flying blind.
→ REWARD CALCULATOR
ITEM LOCATOR
Where to find every ingredient Wikelo asks for — ores, fauna drops, mission loot, crafted components. Locations, quantities, and the fastest known farming method for each.
→ ITEM LOCATOR
⚠
KNOWN BUGS — 4.7.0 LIVE
Stack All disabled — Bulk stacking off on LIVE, stack manually for now.
Freight elevators — Still prone to breaking on turn-in. Relog at the station if stuck.
Rewards missing — Select "Decline" on retrieval — items appear in local inventory.
ASOP terminals — Vehicle delivery errors — retry or use a different terminal.
Ace loot scatter — EMP the ship before destroying to keep loot contained.
FAN-MADE · NOT AFFILIATED WITH CIG · DATA FROM IN-GAME TESTING, WIKELOTRADES.COM AND STARCITIZEN.TOOLS · Star Citizen™ owned by Cloud Imperium Rights LLC
WIKELO'S EMPORIUM
// ALL CONTRACTS · CLICK TO VIEW DETAILS & NOTES
← SELECT A CONTRACT
TO VIEW ITEMS, VERIFY
AND ADD NOTES
TO VIEW ITEMS, VERIFY
AND ADD NOTES
ITEM LOCATOR
// WHERE TO FIND EVERY INGREDIENT WIKELO REQUESTS
REPUTATION TRACKER
// WIKELO TRADE REPUTATION
ENTER YOUR CURRENT REP TIER (0–5)
Rep earned by completing Wikelo trade contracts. Added in 4.5.0. Exact rep values per contract still being confirmed by community.
SHIP REWARD CALCULATOR
// SELECT A SHIP — GET YOUR COMPLETE FARMING PLAN
← SELECT A SHIP
TO SEE YOUR
COMPLETE FARMING PLAN
TO SEE YOUR
COMPLETE FARMING PLAN
FAVOR / SCRIP CALCULATOR
// HOW MANY FOXWELL MISSIONS DO YOU NEED TO RUN?
— OR —
ENTER A TARGET TO SEE YOUR PLAN
YELLOW PATROL / AMBUSH
1–4
scrip · 2–4 ships · ~3 min · LOW risk
ORANGE PATROL ★ BEST
8–15
scrip · 6–8 ships · ~4–5 min · MED risk
RED PATROL
18–24
scrip · 10–15 ships · ~6–8 min · HIGH risk
SCRIP → FAVOR RATE
50:1
50 MG Scrip = 1 Wikelo Favor (fixed)
⚡ Orange is most efficient — best scrip-per-minute. Ace Pilot (~25% chance) drops 1 Ace Interceptor Helmet — EMP before destroying.
⚡ Red vs Orange: Red pays ~21 scrip avg but takes 50–60% longer with much harder fights.
⚡ Red vs Orange: Red pays ~21 scrip avg but takes 50–60% longer with much harder fights.
ASD ONYX FACILITY GUIDE
// PHASE 1 · PHASE 2 · SITE B · LOOT · HAZARDS
FACILITIES
100+
across Stanton moons
PHASE 1 REWARD
5
ASD Drives (one-time)
PHASE 2 REWARD
10
ASD Drives (one-time)
REPEAT RATE
~4–6
drives/hr on Phase 2 repeaters
📷 FACILITY PHOTOS

Surface hangars — contact ATC on approach
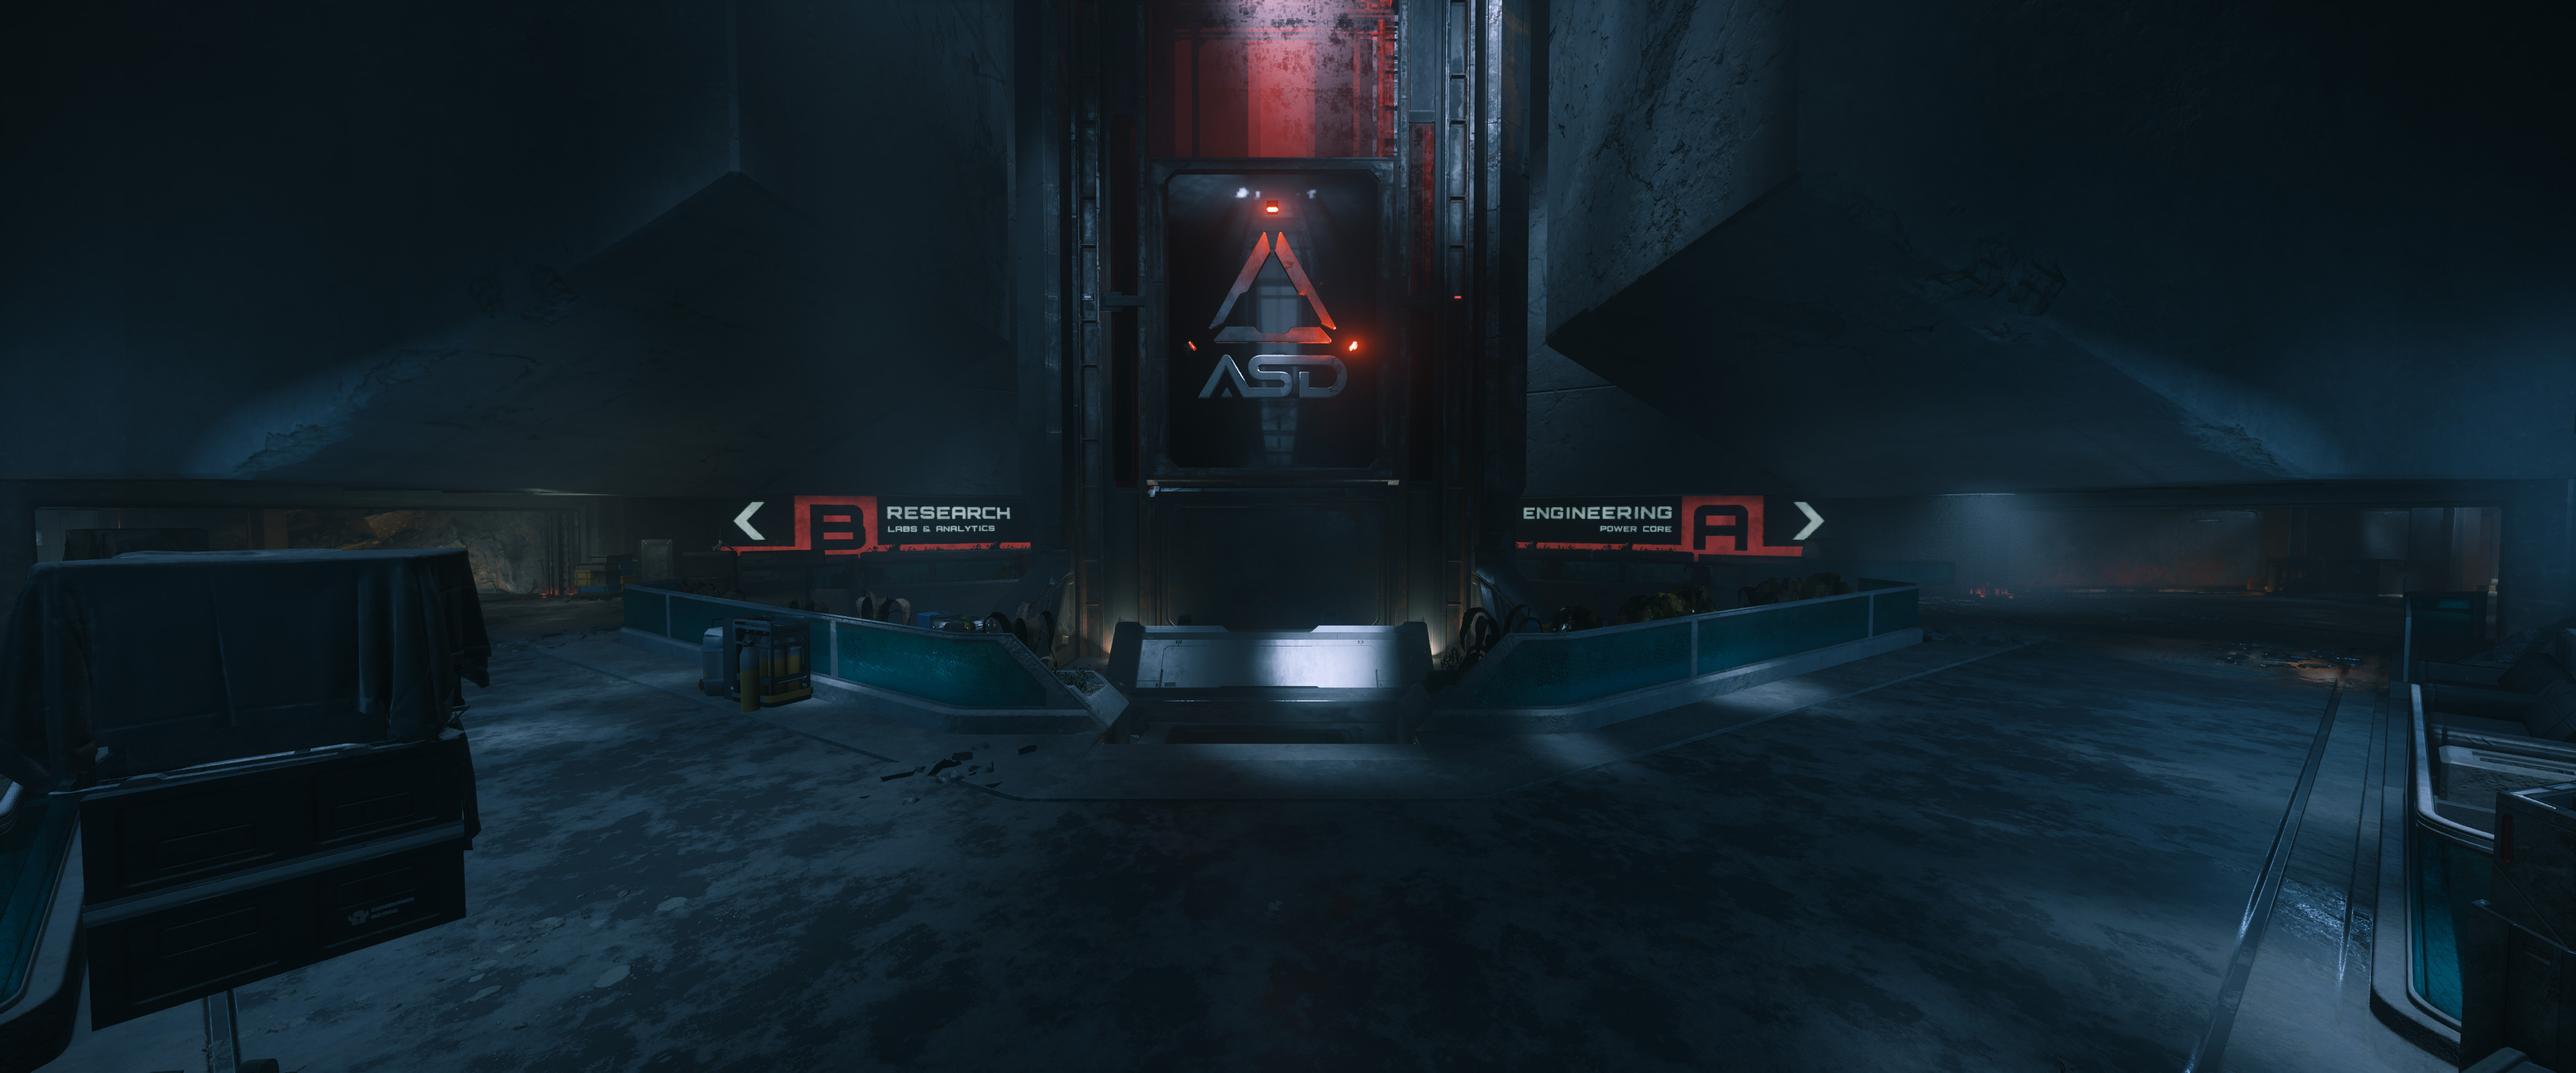
Main elevator down — Engineering right, Research left
CONTRACT SOURCEHackrow Agency — Investigation tab
MISSION GIVERArken Mallor
FIRST MISSIONNo QT marker — navigate manually to moon
ENTRYTwo large hangars on surface — contact ATC
SHIP SIZELarge only — XL ships cannot fit
ASD DRIVESAppear at HOME LOCATION — not on your person
LOGGING OUTMid-mission logout cancels all progress
⚠ GROUP WARNING: Only the player who accepted the mission receives ASD Drives on completion. Shared rewards are not available. If running as a group, each player must accept their own mission separately to each earn drives. Running one contract between four players = only one person gets paid.
ENGINEERINGRight from main elevator — radiation core, zero-G, fuel reactor
RESEARCHLeft from main elevator — sub-levels 4–9, Vanduul Blade, Site B access via level 9
SITE BDeepest point — RCMBNT source, Yormandi boss. Unlocked after Phase 1 + 2.
Step 1Complete Phase 1 (3 missions)
Step 2Complete Eckhart or Red Wind intro
Step 3Phase 2 unlocks + repeatable contracts
Step 4Complete Phase 2 (3 missions)
Step 5Site B unlocks — RCMBNT + Yormandi
RepeatablePhase 2 repeaters: 1 drive each, ~10–15 min
📷 PHASE 1 PHOTOS
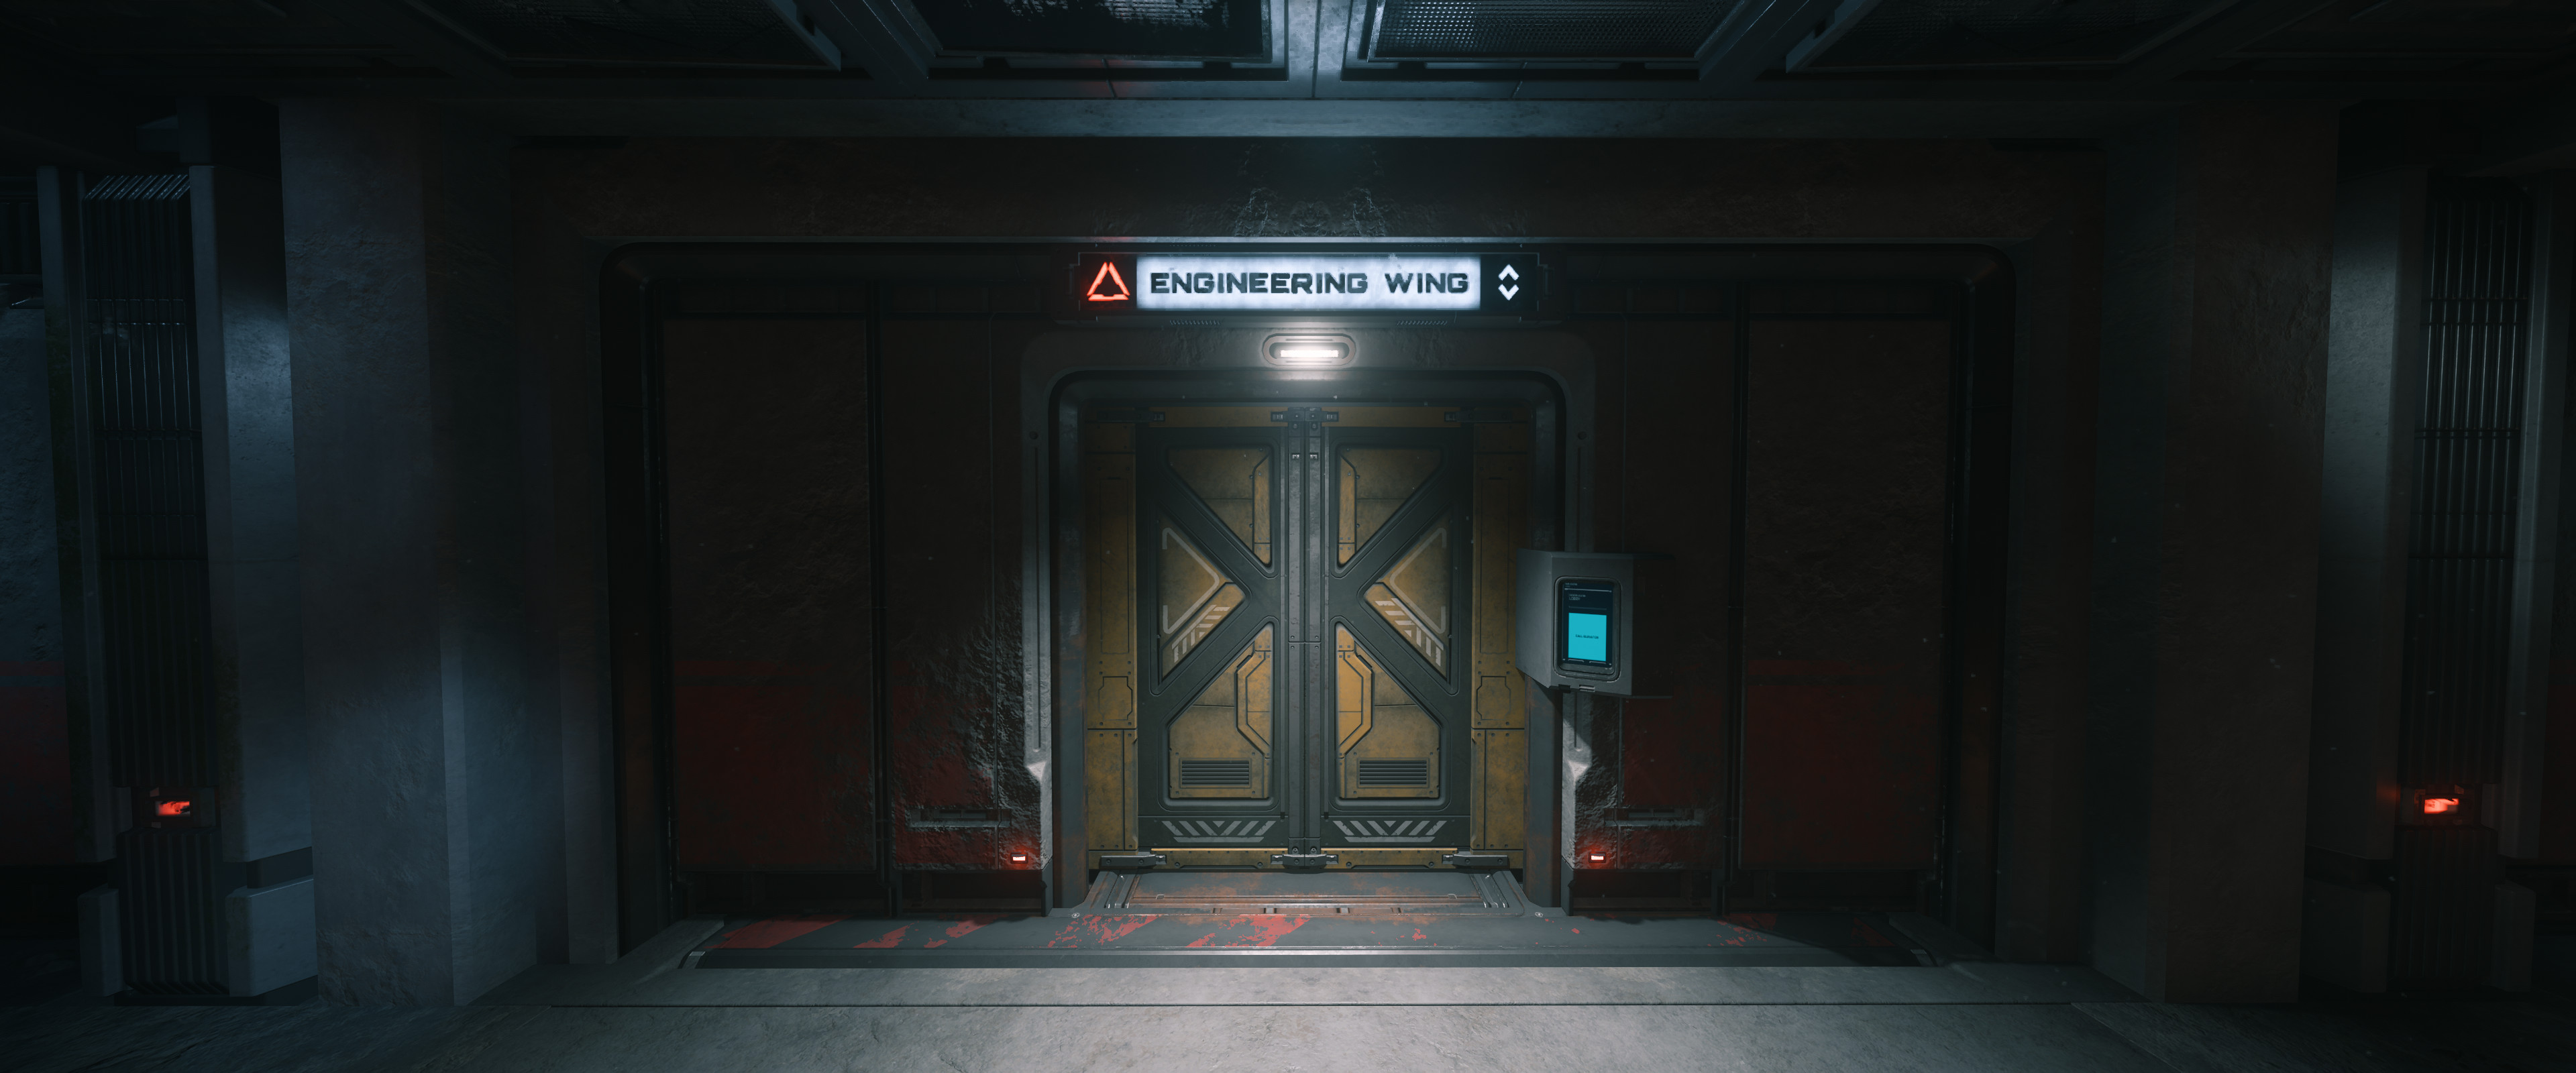
Engineering wing entrance — turn right from main elevator
SHOT NEEDED: POINT OF NO RETURN
The exit vent — once you drop, you can't go back. Loot first.
SHOT NEEDED: VOLT ZENITH RACK
Free Volt Zenith sniper rifle — weapon rack near the exit vent
SHOT NEEDED: RESEARCH DROP SHAFT
Research sub-level drop shaft — use ladders, fatal fall possible
WINGEngineering
QT MARKERNone on first run
GEARMultitool + mining/repair module
ENEMIESLight/medium pirates, Juvenile Valakkar in tunnels
WALKTHROUGH
1. Land → main elevator down
2. Engineering (right) → download personnel data
3. Move to Research wing → complete objective
4. Return through Engineering → point of no return
5. Navigate pipes section → warehouse
6. Voice recorder in locker
7. Exit via vent system past Volt Zenith weapon rack
8. Lobby elevator to exit
2. Engineering (right) → download personnel data
3. Move to Research wing → complete objective
4. Return through Engineering → point of no return
5. Navigate pipes section → warehouse
6. Voice recorder in locker
7. Exit via vent system past Volt Zenith weapon rack
8. Lobby elevator to exit
COMMUNITY TIPS
Free Volt Zenith: The weapon rack near the exit vent is easy to miss — look right as you enter the vent section. Always grab it.
Point of no return: Once you drop into the pipe section you cannot easily go back. Loot the warehouse first.
Kopion in tunnels: Juvenile Valakkar in the natural tunnel after the pipes section. They're fast — have your weapon ready before entering.
Multitool tip: If you forgot yours, there are crafting kiosks just inside the hangar entrance. Craft a mining module there before going deeper.
WINGResearch (sub-level 7)
ENEMIESMedium pirates, escaped Kopion
NOTABLE3× weapon racks in security chamber
WALKTHROUGH
1. Sub-level 4 reception → drop down elevator shaft
2. Sprint right then right again across open shaft
3. Sub-level 7 (Analytics)
4. Voice recorder in security room locker
5. Three weapon racks in next chamber
6. Complete data retrieval → exit
2. Sprint right then right again across open shaft
3. Sub-level 7 (Analytics)
4. Voice recorder in security room locker
5. Three weapon racks in next chamber
6. Complete data retrieval → exit
WINGSEngineering + Research
REWARD5 ASD Drives + Phase 2 unlock
ENEMIESHeavy Sterling suits, Kopion, Valakkar
WALKTHROUGH
1. Engineering: download Jorrit's recent files
2. Research sub-level 6 (Xenotechnology)
3. Blank data drive from desk → insert into terminal
4. Wait for transfer → recover drive
5. Exit via hidden shaft sprint path
6. Deliver drive to low orbit station
2. Research sub-level 6 (Xenotechnology)
3. Blank data drive from desk → insert into terminal
4. Wait for transfer → recover drive
5. Exit via hidden shaft sprint path
6. Deliver drive to low orbit station
COMMUNITY TIPS
Study the Xeno lab now: Sub-level 6 Xenotechnology has the Vanduul Blade atrium and bio processing unit — memorise this layout because you'll be back here constantly for RCMBNT farming.
Terminal transfer: The data drive transfer takes about 15–20 seconds. Stay at the terminal — walking away cancels it.
Hidden shaft route: The exit uses the same hidden shaft sprint path from P1M1. If you know it, this mission becomes much faster.
Terminal transfer: The data drive transfer takes about 15–20 seconds. Stay at the terminal — walking away cancels it.
Hidden shaft route: The exit uses the same hidden shaft sprint path from P1M1. If you know it, this mission becomes much faster.
📷 PHASE 2 PHOTOS
SHOT NEEDED: POWER CORE OVERVIEW
Power core from entrance — Alpha, Beta, Gamma struts visible
SHOT NEEDED: STRUT SAFE ZONE
Standing on a strut between pulses — the correct sprint path
SHOT NEEDED: EXIT DOOR FAR SIDE
Shielded exit door on the far side of the power core
WINGEngineering → Power Core
KEY HAZARDRadiation pulse EVERY 30 SECONDS
ENEMIESSterling elites — 4 per platform, 6 platforms
WALKTHROUGH
1. Engineering → control room (right side)
2. Upload power data at terminal
3. Retrieve server blade from next room
4. Fuel reactor → time the 30-second pulses
5. Parkour path into reactor core
6. Navigate Alpha/Beta/Gamma struts
7. Use shielded exit door on far side
8. Deliver data to low orbit station
2. Upload power data at terminal
3. Retrieve server blade from next room
4. Fuel reactor → time the 30-second pulses
5. Parkour path into reactor core
6. Navigate Alpha/Beta/Gamma struts
7. Use shielded exit door on far side
8. Deliver data to low orbit station
⚠ POWER CORE: Pulse fires every 30 seconds. Count the rhythm, sprint across during the window. Use the 3 large struts (Alpha, Beta, Gamma) as cover. Crossing mid-pulse = death. The exit door is on the OPPOSITE side of where you enter — commit to crossing and don't stop.
COMMUNITY TIPS
Counting the pulse: Listen for the hum buildup before each pulse. Some players count to 28 then sprint — gives a small buffer.
Sterling elites on platforms: You don't have to fight all 24. Snipe from the entrance strut or use the platforms as cover and run past if you're fast enough.
Power Usage Data bug: Community reports this repeatable contract has a bug where the final storage step fails. If it happens, try switching your character body type in the character editor before rerunning.
WINGResearch sub-level 6
KEY MECHANICZero-G server blade retrieval
BUG WORKAROUNDIf door stuck: use right-hand vent
WALKTHROUGH
1. Research sub-level 6 → Energy Lab
2. Pass the drop shaft carefully
3. Collect server blade from Zero-G area
4. Return to office → insert blade into rack
5. Write seismic data onto blade
6. Door stuck? → right-hand vent to climb out
7. Deliver to low orbit station
2. Pass the drop shaft carefully
3. Collect server blade from Zero-G area
4. Return to office → insert blade into rack
5. Write seismic data onto blade
6. Door stuck? → right-hand vent to climb out
7. Deliver to low orbit station
WINGSEngineering + Research combined
REWARD10 ASD Drives + Site B unlock
DIFFICULTYHardest Phase 2 — group recommended
REPEATABLE CONTRACTS UNLOCKED
After completing all Phase 2 missions, four repeatable tracks unlock:
• Energy Anomaly Data • Security Data
• Seismic Data • Power Usage Data
Each pays 1 ASD Secure Drive + aUEC per completion (~10–15 min)
• Energy Anomaly Data • Security Data
• Seismic Data • Power Usage Data
Each pays 1 ASD Secure Drive + aUEC per completion (~10–15 min)
📷 SITE B PHOTOS
SHOT NEEDED: VANDUUL BLADE ATRIUM
Sub-level 6 Xenotechnology — Vanduul Blade + bio processing unit
SHOT NEEDED: RCMBNT BIO PROCESSOR
Bio processing unit — source of PWL and XTL components
SHOT NEEDED: YORMANDI CHAMBER
Yormandi boss chamber overview — Site B deepest level
SHOT NEEDED: YORMANDI WEAK POINTS
Green pustules on the Yormandi body — target these for damage
Jorrit Dossier: Project Hyperion missions are the only source of RCMBNT components. Each run ~15–20 min, yields 1 component. Pick your mission variant before accepting — it determines which component you receive.
CONTRACTJorrit Dossier: Project Hyperion
SOURCEHackrow Agency — Investigation tab
RATE~3.5 components/hr per type
COMPONENT TYPES
RCMBNT-RGL (1, 2, 3)
Gravity Labs variant — select RGL mission
RCMBNT-PWL (1, 2, 3)
Bio Processing Unit — left of Vanduul Blade (sub-level 6)
RCMBNT-XTL (1, 2, 3)
Bio Processing Unit — XTL mission variant
COMMUNITY TIPS
RGL = gravity labs, PWL/XTL = bio processors. You need all 9 types for Polaris and Idris-P — plan your runs per type.
Fastest farming route: Once you know the layout, RCMBNT runs take ~12–15 min. The bottleneck is the security checkpoint before the lab antechamber — clear it fast or stealth past.
Don't mix mission variants: Accept the contract before entering. Picking up the wrong component type means the run doesn't count toward your Wikelo contract.
Community maps: MrKraken's companion guide on the RSI Community Hub has detailed floor maps for every wing including Site B — highly recommended for first-timers.
The Yormandi is a massive cave creature in the deepest Site B chamber. Drops Yormandi Eye and Tongue — both needed for multiple Wikelo contracts.
LOCATIONSite B boss chamber — elevator from Site B lobby
DIFFICULTYGroup strongly recommended — 2–4 players
PHASE 1Burrow strikes — watch ground disturbance tells
PHASE 2Target weak vents on body — flank from sides
PHASE 3Acid pools spawn — keep moving constantly
DROPSYormandi Eye + Tongue (~5/hr combined group)
RECOMMENDED LOADOUT
• Heavy armour with radiation resistance
• P8-AR or Fresnel LMG for sustained DPS
• Med-gel (100k aUEC/200 units at hospitals)
• Medic in group for revives
• Clear adds before pulling boss
• P8-AR or Fresnel LMG for sustained DPS
• Med-gel (100k aUEC/200 units at hospitals)
• Medic in group for revives
• Clear adds before pulling boss
COMMUNITY TIPS
Music cue: "Onyx Yormandi Battle" plays eerie swells before ambush phases — use it as an audio tell.
Acid pools phase 3: Spawn under you with almost no warning. Never stand still — keep circling.
Role split: One player kites/draws aggro, rest flank the weak vents from the sides. All-frontal DPS extends the fight massively.
Respawn tip: Park your ship outside with a Tier 2+ med bed. If someone dies they respawn on the ship and run back in rather than losing the whole run.
📷 LOOT PHOTOS
SHOT NEEDED: ORANGE LOOT BOX
Orange loot box — source of ASD Geist armor pieces
SHOT NEEDED: ASD GEIST ARMOR
ASD Geist Stealth Armor set — rare orange box drop
Phase 1 completion5 drives (one-time only)
Phase 2 completion10 drives (one-time only)
Phase 2 repeatable1 drive per run (~10–15 min)
Farm rate~4–6 drives/hr on repeaters
WHERE THEY APPEARHOME LOCATION inventory — not on your person
IMPORTANT
Drives appear in your Home Location inventory — check the freight elevator at your home hangar if you can't find them.
Golem Rocks
Spirit Cargo Mod
Snow Snipe
Hide Snow Suit
Asgard Fight Mod
Starlifter A2 War Mod
New Make Polaris
Starlancer MAX Mod
Idris-P
Volt Zenith Sniper Rifle
Weapon racks — Engineering + Research storage rooms
ASD Geist Stealth Armor
Orange loot boxes — Engineering + Research wings
ASD Geist (Black variant)
Same orange boxes — rare. Can take dozens of runs.
NN-13 Cannon
Orbituary Hangar 30 or Onyx loot rooms — duplicate at printers
Yormandi Eye + Tongue
Yormandi boss, Site B — ~5/hr group farm
RCMBNT Components (×9 types)
Project Hyperion missions, Site B
1. Orange loot boxes → Geist armor pieces
2. Weapon racks → Volt Zenith Sniper
3. Security room lockers → voice recorders + bonus gear
4. Freight elevator → store valuables before exiting
2. Weapon racks → Volt Zenith Sniper
3. Security room lockers → voice recorders + bonus gear
4. Freight elevator → store valuables before exiting
Items in local inventory may not persist across major patches. Use ship cargo for anything you want to keep long-term.
📷 HAZARD PHOTOS
SHOT NEEDED: ZERO-G SECTION
Zero-G EVA section in Engineering wing
SHOT NEEDED: RADIATION ZONE
Engineering fuel reactor radiation zone — stay behind barriers
⚠ POWER CORE PULSE — Every 30 seconds. Count rhythm, sprint during window. Use Alpha/Beta/Gamma struts as cover. Mid-pulse = near-instant death.
Radiation zonesEngineering fuel reactor and power core — use barriers
Zero-G sectionsEVA required in Engineering and Site B areas
Pipes puzzleEngineering — requires multitool. Craft on-site if needed.
Drop shaftsResearch — fatal falls possible. Use ladders.
Point of no returnEngineering — loot everything before crossing
Gravitational anomalyResearch Energy Lab — smaller than power core but still dangerous
ArmourHeavy with radiation resistance
MultitoolRequired — mining + Cambio SRT modules
MedicalMed-gel (100k/container). Tier 2 med bed on ship outside.
WeaponsP8-AR, Fresnel LMG, or Volt Zenith — sustained DPS required
ShipLarge hangar only — XL ships cannot enter
Light Pirates
Entrance areas — easy solo
Medium Pirates
Research wing — watch flanks
Sterling Elite NPCs
Power core — 4 per platform, 6 platforms, high HP
Juvenile Valakkar
Engineering tunnel — fast, moderate damage
Escaped Kopion
Research lower levels — former animal testing pens
Yormandi
Site B boss chamber — multi-phase, group required
🔑 First visit — no QT marker. Navigate to moon manually.
🔑 ASD Drives → Home Location inventory, not character. Check freight elevator at home hangar.
🔑 Group runs — EACH player must accept their own mission. Only the mission acceptor receives drives. Running one contract as a group = one payout total.
🔑 Logout mid-mission cancels all progress. Finish or stay logged in.
🔑 30-second pulse — listen for the hum buildup, sprint on the silence.
🔑 Door bug P2M2 → right-hand vent to climb out.
🔑 Power Usage Data bug → try switching character body type in character editor if final step fails.
🔑 Multitool — craft at kiosks just inside the hangar if you forgot one.
🔑 Site B — Phase 1 AND Phase 2 both required first.
🔑 RCMBNT — choose variant before accepting mission, not after.
🔑 Terminal transfers — stay at the terminal until it completes (~15–20 sec). Walking away cancels it.
📋 COMMUNITY MAPS: MrKraken's Onyx Companion Guide on the RSI Community Hub has detailed floor maps for every wing including Site B. Search "Onyx Companion Guide MrKraken" on the RSI Community Hub — highly recommended before your first run.